


How To: Reseal Your Tent Seams
by Dan Slater
Sadly, modern lightweight tents don't last forever, especially if their waterproofing involves sealing the inside of the stitched seams with seam tape, by far the most usual method. This narrow tape is applied under great pressure to the tent fabric by factory machinery, and if stored improperly (see our previous blog on smart storage of your gear) can delaminate, leaving your tent prone to water ingress and a horrible flaky texture to boot. Not nice!

However, please don't throw your expensive and non-biodegradable tent away just yet! It's quite easy to reseal the seams and get many more years of camping out of the old thing. If you haven't done this before it can seem a daunting and messy process, but with this handy guide you'll be able to revitalize your 2-man palace in a couple of hours, stress free.

1. Set up your tent as normal, but with the flysheet inside out so the offending seams are exposed.


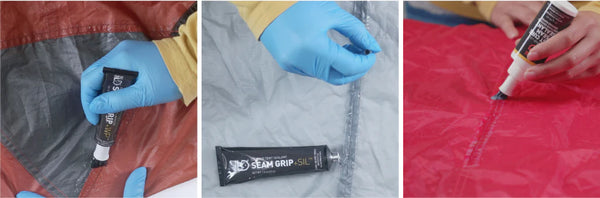
4. At this point you'll need a tube of something to seal the seams. But what? Gear Aid make a range of sealants for all kinds of tents so it's handy to know something about the construction of your tent at this point.
Most high end lightweight tents use nylon or polyester flysheets siliconised on the outside and coated with polyurethane on the inside. If this is the case, Seam Grip + FC is the go, one bottle of liquid (with application brush) sufficient for a two- to three-man tent. You can also use Seam Grip + WP, which is more of a thick glue but is also useful for many other types of on-the-go repairs. If your flysheet is siliconised on both sides (known as sil/sil), you'll need Seam Grip + Sil as regular Seam Grip will not stick to it. A sil/sil tent will not have had seam tape on in the first place, but if you buy one it is a good idea to seal it yourself at home for extra protection. In this case, even though my tent was not siliconised on the inside, I used Seam Grip + Sil for extra stickiness. It will still work.
I am also choosing to thin out the sealant with mineral turpentine, which makes it go further and is easier to apply. I have found no reduction in effectiveness by doing this in the past.

5. Mix the sealant and turps together. I don't have a mixing ratio or the exact viscosity in centipoise; just experiment until the liquid is gooey and drips slowly off the brush. Too thick is better than too thin.

6. Apply the mixture to the seams with a handy brush (usually included with the sealant) as evenly as possible. Don't worry if it's not worthy of a shopping mall nail salon; it's on the inside. You'll want to go at least 5mm past the stitching and slop it generously over bar tacks and corners.

7. Leave it to dry. Have a beer. Watch Game of Thrones.

8. You can leave it there but some people like to sprinkle talcum powder over the (thoroughly dried) sealant to prevent it sticking to the fly when rolled up. I've never had this problem but I decided to do it anyway, just for fun.

9. And there you go! Your tent is now as good as new, sort of, and you've saved yourself about $600. Congratulations.
10. Okay, I admit, sometimes a tent is totally beyond repair: the siliconisation is itself flaking off all over the flysheet and you risk waking up in a snowdrift; the holes gnawed by the local rodents have simply become too large and numerous to patch effectively; you've found a new camping partner and need a second tent.
If any or all of the above are true, don't worry, we have plenty of great new tents from which you can choose a new one. One-, Two- or Three-person, Dome or Tunnel, Nylon or Polyester, Sil or Sil/Sil - we've got 'em all, and sales staff who know how to use them. Click here for inspiration!